Nginx
Nginx的安装
Nginx安装配置详情请见 https://www.runoob.com/linux/nginx-install-setup.html
Nginx的配置文件(含有一部分注释)
关于Nginx的核心配置文件
1
2
3
4
5
6
7
8
9
10
11
12
13
14
15
16
17
18
19
20
21
22
23
24
25
26
27
28
29
30
31
32
33
34
35
36
37
38
39
40
41
42
43
44
45
46
47
48
49
50
51
52
53
54
55
56
57
58
59
60
61
62
63
64
65
66
67
68
69
70
71
72
73
74
75
76
77
78
79
80
81
82
83
84
85
86
87
88
89
90
91
92
93
94
95
96
97
98
99
100
101
102
103
104
105
106
107
108
109
110
111
112
113
114
115
116
117
118
119
120
121
122
123
124
125
126
127
128
129
130
131
132
133
134
135
136
137
138
139
|
#user nobody;
worker_processes 1;
# 以上统称为全局块
# worker_processes他的数值越大,Nginx的并发能力就越强
#error_log logs/error.log;
#error_log logs/error.log notice;
#error_log logs/error.log info;
# error_log 代表Nginx的错误日志存放的位置
#pid logs/nginx.pid;
events {
worker_connections 1024;
}
# events块
# worker_connections它的数值越大,Nignx并发能力越强
http {
include mime.types;
default_type application/octet-stream;
#log_format main '$remote_addr - $remote_user [$time_local] "$request" '
# '$status $body_bytes_sent "$http_referer" '
# '"$http_user_agent" "$http_x_forwarded_for"';
#access_log logs/access.log main;
sendfile on;
#tcp_nopush on;
#keepalive_timeout 0;
keepalive_timeout 65;
#服务器集群配置
upstream yangkai.com{#服务器集群名称
server 127.0.0.1:18080 weight=1;#服务器配置,weight是权重,权重越大,分配概率越大
server 127.0.0.1:28080 weight=2;
}
#gzip on;
server {
listen 8888;#监听端口号
server_name localhost;
#charset koi8-r;
#access_log logs/host.access.log main;
#更改配置
location / {
#root html;
#index index.html index.htm;
proxy_pass http:
proxy_redirect default;
}
#location块
# root :将接收到的请求根据/usr/share/nginx/html去查找静态资源
# index:默认去上述的路径中找到index.html或者index.htm
#error_page 404 /404.html;
# redirect server error pages to the static page /50x.html
#
error_page 500 502 503 504 /50x.html;
location = /50x.html {
root html;
}
# server块
# listen: 代表Nginx监听的端口号
# localhost:代表Nginx接收请求的ip
# proxy the PHP scripts to Apache listening on 127.0.0.1:80
#
#location ~ \.php$ {
# proxy_pass http:
#}
# pass the PHP scripts to FastCGI server listening on 127.0.0.1:9000
#
#location ~ \.php$ {
# root html;
# fastcgi_pass 127.0.0.1:9000;
# fastcgi_index index.php;
# fastcgi_param SCRIPT_FILENAME /scripts$fastcgi_script_name;
# include fastcgi_params;
#}
# deny access to .htaccess files, if Apache's document root
# concurs with nginx's one
#
#location ~ /\.ht {
# deny all;
#}
}
# http块
# include代表引入一个外部的文件 -> /mime.types中放着大量的媒体类型
# include /etc/nginx/conf.d/ *.conf; -> 引入了conf.d目录下的以.conf为结尾的配置文件
# another virtual host using mix of IP-, name-, and port-based configuration
#
#server {
# listen 8000;
# listen somename:8080;
# server_name somename alias another.alias;
# location / {
# root html;
# index index.html index.htm;
# }
#}
# HTTPS server
#
#server {
# listen 443 ssl;
# server_name localhost;
# ssl_certificate cert.pem;
# ssl_certificate_key cert.key;
# ssl_session_cache shared:SSL:1m;
# ssl_session_timeout 5m;
# ssl_ciphers HIGH:!aNULL:!MD5;
# ssl_prefer_server_ciphers on;
# location / {
# root html;
# index index.html index.htm;
# }
#}
}
|
Nginx的反向代理
正向代理和反向代理介绍
正向代理:
- 正向代理服务是由客户端设立的。
- 客户端了解代理服务器和目标服务器都是谁
- 帮助咱们实现突破访问权限,提高访问的速度,对目标服务器隐藏客户端的ip地址。
反向代理:
- 反向代理服务器是配置在服务端的。
- 客户端是不知道访问的到底是哪一台服务器。
- 达到负载均衡,并且可以隐藏服务器真正的ip地址。
基于Nginx实现反向代理
准备一个目标服务器
启动了之前的tomcat服务器
编写nginx的配置文件,通过Nginx访问到tomcat服务器
1
2
3
4
5
6
7
8
9
| server{
listen 80;
server_name:localhost;
# 基于反向代理访问到Tomcat服务器
location / {
proxy_pass http://192.168.199.109:8080/;
}
}
|
关于Nginx的location路径映射
优先级关系如下:
1
2
3
4
5
6
7
8
9
10
11
12
13
14
15
16
17
18
19
20
21
22
23
24
25
26
27
28
29
| # 1.直接匹配
location = / {
# 精准匹配,主机名后面不能带任何的字符串
}
# 2.通用匹配
location /xxx {
# 匹配所有以/xxx开头的路径
}
# 3.正则匹配
location ~ /xxx{
# 匹配所有以/xxx开头的路径
}
# 4.匹配开头路径
location ^~ /images/{
# 匹配所有以/images开头的路径
}
# 5.匹配后缀
location ~* \.(gif|jpg|png)${
# 匹配以gif或者jpg或者png为结尾的路径
}
# 6.全部通配
location /{
# 匹配全部路径
}
|
Nginx负载均衡
Nginx为我们默认提供了三种负载均衡的策略:
- 轮询:将客户端发起的请求,平均的分配给每一台服务器。
- 权重:会将客户端的请求,根据服务器的权重值不同,分配不同的数量
- ip_hash:基于发起请求的客户端的ip地址不同,他始终会将请求发送到指定的服务器上。
轮询
想实现Nginx轮询负载均衡机制只要在配置文件中添加以下内容
1
2
3
4
5
6
7
8
9
10
11
12
13
14
| upstream 名字{ //服务器集群名称
server ip:port; //服务器配置
server ip:port;
...
}
server {
listen 80;
server_name localhost;
location / {
proxy_pass http://upstream的名字/;
}
}
|
权重
1
2
3
4
5
6
7
8
9
10
11
12
13
14
| upstream 名字{ //服务器集群名称
server ip:port weight=权重比例; //服务器配置,weight是权重,权重越大,分配概率越大
server ip:port weight=权重比例;
...
}
server {
listen 80;
server_name localhost;
location / {
proxy_pass http://upstream的名字/;
}
}
|
ip_hash
1
2
3
4
5
6
7
8
9
10
11
12
13
14
| upstream 名字 {
ip_hash;
server ip:port;
server ip:port;
}
server{
listen 80;
server_name localhost;
location / {
proxy_pass http://upstream的名字/;
}
}
|
Nginx动静分离
Nginx的并发能力公式:
worker_processes * worker_connections /4|2=Nginx最终的并发能力
动态资源需要/4,静态资源需要/2
Nginx通过动静分离,来提升Nginx的并发能力,更快的给用户响应
动态资源代理
使用proxy_pass动态代理
1
2
3
4
| # 配置如下
lcoation /{
proxy_pass 路径;
}
|
静态资源代理
使用root静态代理
1
2
3
4
5
6
7
8
9
10
| # 配置如下
lcoation / {
root 静态资源路径;
index 默认访问路径下的什么资源;
autoindex on ; #代表展示静态资源全的全部内容,以列表的形式展开
}
# 先修改docker,添加一个数据卷,映射到Nginx服务器的一个目录
# 添加了index.html和1.jpg静态资源
# 修改配置文件
|
Nginx集群
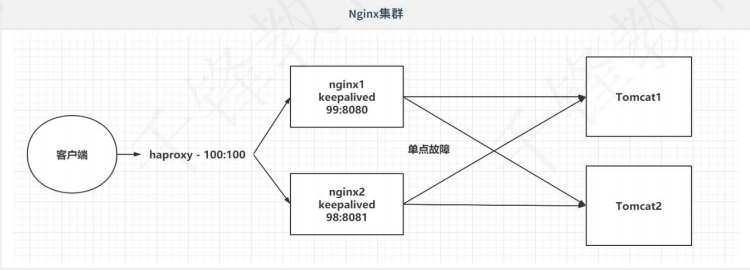
集群结构
单点故障,避免nginx的宕机,导致整个程序的崩溃
准备多台Nginx。
准备keepalived,监听nginx的健康情况
准备haproxy,提供一个虚拟路径,统一的去接收用户的请求

搭建Nginx集群
查看资料中的内容,直接通过运行docker-compose即可


